
“Dear, don’t cause a fuss. I’ll have your spam. I love it. I’m having spam spam spam spam spam spam spam baked beans spam spam spam and spam!” – Man (actor Eric Idle), Monty Python’s “Spam”
Spam Is Not Music To Our Ears
It is no secret: We all despise spam (except for the salty canned “meat,” of course). Spam gums up our inboxes, fills up our contact form entry lists, and generally serves no valid purpose in our technological lives whatsoever.
And we’re not alone in our disdain. Over the last (let’s say) year or two, email service providers (ESPs) such as Gmail, Yahoo, Hotmail and AOL (yes, they’re still a thing) have waged an all-out war against spam.
But what if these “spammy” emails aren’t that at all? What if they’re emails that your website is trying to send (such as order confirmations) to actual customers and visitors?
That’s why tools such as Mailgun for WordPress are so important. Not knowing if your emails are being delivered is a critical tenet of communication overall: Signal sent. Signal received. It’s simply how we all function.
At CodeGeek, we like to let Mailgun take the guesswork out of the communications coming from your website, allowing us all to sleep a little easier at night knowing those new leads and (more importantly) new order emails are coming through as expected.
Why Your Legit Emails Could Be Collateral Damage
As I mentioned, email service providers also despise spam, and for good reasons. Their objective for ridding spam from our inboxes is two-fold:
- Right out of the gate, ESPs want to provide us with a better email experience. So by taking measures to prevent spam before it gets to our inboxes, they are providing a service to their consumers directly. (Thanks!)
- Second is to mitigate the “wear and tear” on their servers. Having to process all of that completely useless email for no real purpose is taxing on servers worldwide.
There is, however, a downside to this “tightening of the rules” by the ESPs. The primary collateral damage in this war is the legitimate emails being generated by web servers. Some say that upwards of 90% of all email is spam.
Whether you have a simple contact form on your site or rely on order confirmation emails to generate income for your business, emails coming from your website are important. And since the vast majority of us are on some sort of shared hosting for our websites, that means there are thousands of emails being sent by that web server on a daily (hourly?) basis. And THAT is exactly the kind of red flag that the ESPs are looking for (and shutting down.)
More and more of our website-originated emails are being caught up in the spam filters and (in some cases) not even making it to the recipient’s spam folder. Some are outright being smushed before they ever hit your computer, phone or browser.
And because, as noted above, your website is living in a shared environment with a (sometimes) really high number of other websites, that entire server gets “flagged” and all those emails cease being delivered. Not cool!
But we wouldn’t be writing an article about something so sad as emails not being delivered. The good news is: There’s a solution!
How To Get Your Emails Delivered Using Mailgun
One solution to help get your emails delivered is a service we strongly encourage all our hosting clients to take advantage of, and that is Mailgun. Mailgun is set up on sites to replace the default server-based mailing functionality so those emails do not appear to be originating from that crowded server.
- The service actually uses your own domain name (or a sub-domain) from which to send the emails.
- That way, amidst all the thousands of emails being sent from the web server, YOUR emails appear to be coming from YOUR domain and, therefore, make their way safely and happily to your intended recipient. Hooray!
- One of the best parts about Mailgun is that for up to 10,000 emails per month, the service is free! (Hooray again!)
So unless you are doing massive mailings on a monthly basis, chances are you will fall into that “free” level and enjoy the confidence that your emails are coming through (and going out!) as expected.
Convinced? Then let’s dig in!
Step 1: Sign Up For a Mailgun Account
Below are the steps for getting signed up for your very own Mailgun account:
- Go to https://signup.mailgun.com/new/signup
- Fill out your name, company, and email address and set a password for yourself.
- Add your payment information. Mailgun is free for the first 10,000 emails each month, but they do require you to have payment information on file.
- Don’t change anything with the plan. You want to see Today’s Cost = $0.00
- Click the “I am not a robot” checkbox and Click Create Account
- Check your email inbox for a confirmation email and click the link to confirm your email address.
- You will receive emails from Mailgun explaining how to set up your domain name and connect your site. (Keep reading below.)
Step 2: Set Your Domain Name to Mailgun
Having worked with domains, name servers, DNS and IP addresses for about a decade now, I can tell you this part is a smidge on the nerdy side. It also has some pretty severe consequences if not done properly (such as no emails being sent at all!).
Below are the steps for setting up Mailgun on your website:
- Log in to Mailgun using the credentials they sent you.
- Click on the “Add A Domain” button.
- Enter mg.[example.com] and click “Add Domain.”
- Leave the box checked for “Create DKIM Authority.”
- Leave the radio button at 1024.
- Click on “Add Domain.”
- Follow the instructions provided by Mailgun for creating new DNS records.
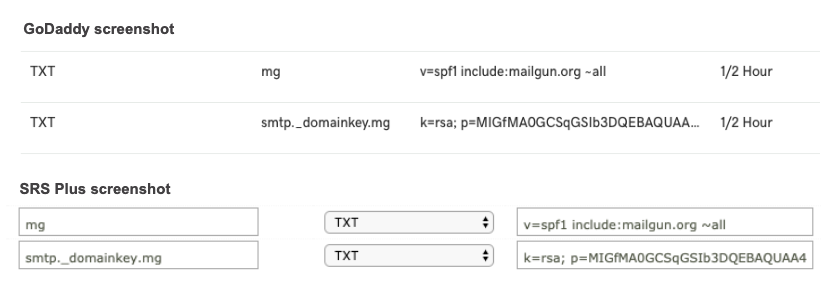
- You will need to set up 2 TXT records and 2 MX records for the mg host (noted above).
- Adding a CNAME (step 3) is optional.
- **Note that when you are adding these records, you do NOT include the actual domain name in the host field (at least not for GoDaddy or SRS Plus).
- Click on the button “Verify DNS Settings.”
- At this point it varies depending on if the domain is verified or not or if the account you are using has multiple domains.
- If you are given the option to choose “API or SMTP,” choose API and PHP. Either one can be used with the Mailgun WordPress plugin to set up sending from your site. Once an option is chosen from this screen, it will show the selected credential, and then will not be seen again for the domain. If you need to see the API key or SMTP credentials after this point to reconfigure your plugin, see below.
Regardless, if you did not get any errors and the domain is “verified,” you will now need to set up the plugin (noted below). You will need the following (“B” is optional):
- A. API KEYS: (left navigation) Settings – API Security (You will see your API keys in there.)
- B. SMTP Credentials: (left navigation) Sending – Domain Settings – SMTP Credentials (tab)
Step 3: How to Connect Mailgun to Your WordPress Website
- Install the Mailgun plugin in your WordPress site: https://wordpress.org/plugins/mailgun/
- Activate the plugin.
- IMPORTANT: Once activated you must immediately configure Mailgun. Email notifications cannot be sent from your site until all below steps are successfully completed.
- In the Dashboard, go to Settings > Mailgun.
- Use HTTP API: Yes
- Mailgun Domain Name: mg.[example.com]
- API Key: Copy/paste from Mailgun
- Click Tracking: No
- If you’d like to track the openings of the emails sent from the website, it’s okay to turn this on. Data will be available within the Mailgun account.
- Open Tracking: No
- From Address: example@example.com (it is OK to not use name@mg.example.com which you created above)
- From Name: [Example] Website
- Override “From” Details: No
- Tag: Leave blank
- “Save Changes” button.
- Click “Test Configuration” button to be sure everything is working. Note: This will not work until you have activated your Mailgun account.
- IMPORTANT: If your test fails and you need to revisit, be sure to deactivate Mailgun, otherwise email notifications cannot be sent from your site.
That’s A Wrap (Or A Can)
Well, look at you! You just set up your own Mailgun account to ensure the timely delivery of emails coming from your website. Congratulations!
If you’re still reading, thanks! It’s nice to have you along for the ride. This is one of those topics that keeps popping up in our team discussions and around our client contact forms. We hope this was a helpful deep dive into the world of unsent and unreceived emails.
Would you like some help with setting up Mailgun for your WordPress website? Give us a call! The Geeks are here for you.